
Using a bottle washer is simple: disassemble bottles, load every part correctly, add approved detergent, and start the cycle. Most all-in-one machines then wash, rinse, sanitize, and dry feeding gear with minimal hands-on work. If you are comparing baby bottle washers, understanding the correct loading and cleaning routine matters most. For safer handling, wash your hands for 20 seconds and follow your machine’s instructions.
Key Takeaways
- Always separate bottles, nipples, rings, valves, and caps before washing.
- Remove leftover milk before placing feeding parts inside the machine.
- Use only detergent approved for your specific bottle washer.
- Position every component so spray jets can reach its surfaces.
- Choose washing, sanitizing, drying, or storage cycles based on your needs.
- Clean the washer regularly to prevent residue, odors, and mineral buildup.
Understand What Your Bottle Washer Actually Does
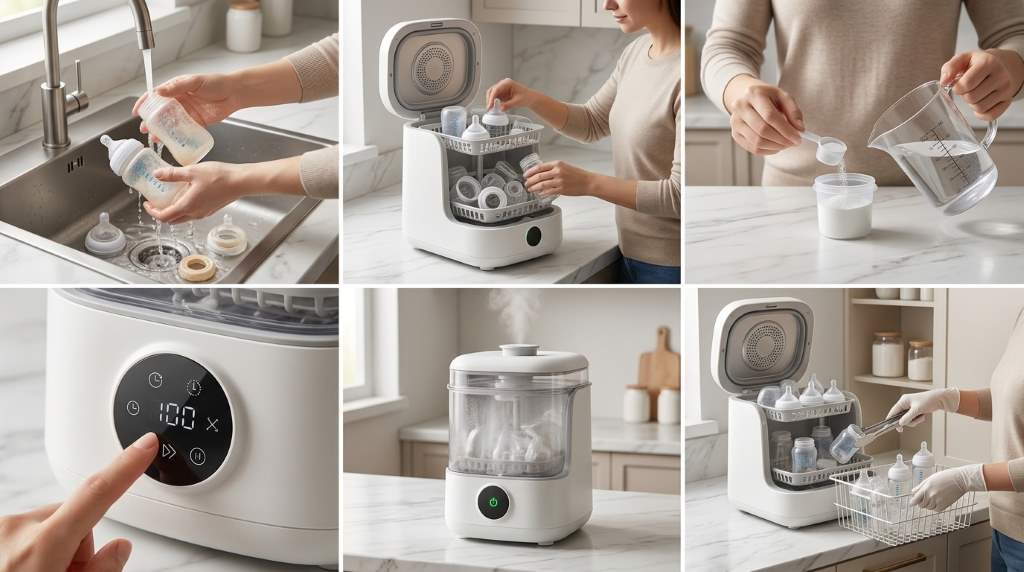
A baby bottle washer works more like a compact dishwasher than a traditional sterilizer. Depending on the model, one machine can wash, rinse, sanitize, dry, and store feeding accessories. However, these functions do not always operate identically across different machines.
Therefore, start by identifying your machine’s available cycles and compatible accessories. Some models use separate water tanks, while others connect directly to a drain. Likewise, some machines require proprietary detergent tablets or solutions.
Washer Versus Sterilizer
A washer removes milk residue and food particles before the sanitizing stage. A sterilizer primarily reduces microorganisms on already-clean feeding equipment. Consequently, a sterilizer cannot replace proper washing when milk residue remains.
An all-in-one washer can simplify both tasks when its manufacturer includes sanitizing functionality. Still, never assume every washer sterilizes automatically after washing. Check the selected cycle and your machine’s operating instructions before each use.
Prepare Bottles Before Loading the Machine
Preparation determines how effectively your washer cleans each component. First, empty leftover milk or formula from every bottle immediately after feeding. Then separate every removable piece before placing anything inside the machine.
Take apart the bottle, nipple, collar, cap, valve, membrane, and other removable components. Small openings can trap milk, so never leave valves or nipples assembled during washing.
Inspect Every Component
Before loading, inspect bottles for cracks, cloudiness, deep scratches, or damaged edges. Also check nipples and silicone parts for tears, thinning, sticky surfaces, or unusual discoloration.
Damaged feeding parts can become difficult to clean thoroughly. Replace questionable components according to the manufacturer’s recommendations rather than relying on another wash cycle.
Load the Bottle Washer Correctly
Correct loading matters because powerful spray jets still need direct access to dirty surfaces. Place bottles according to the rack positions recommended for your particular machine. Keep openings exposed rather than facing them against another component.
Place nipples, valves, rings, and caps in their designated holders or compartments. Avoid stacking small parts because overlapping surfaces can block water and detergent from reaching them.
Use This Loading Sequence
- Remove all leftover milk and formula.
- Disassemble every removable bottle component.
- Rinse heavily soiled parts when your manual recommends pre-rinsing.
- Place bottles into their dedicated rack positions.
- Secure nipples, valves, caps, and rings in their holders.
- Check that spray arms can move without obstruction.
- Confirm that every dirty surface faces the cleaning jets.
Do not overload the chamber simply because empty spaces remain. A slightly smaller load often cleans better than a tightly packed load.
Choose the Right Detergent
Detergent selection can affect cleaning performance, residue, and machine operation. Use only the detergent type and amount approved for your washer. Never substitute ordinary dish soap unless the manufacturer specifically permits it.
Too much detergent can leave unwanted residue and create excessive suds. Too little detergent may struggle with dried milk or formula deposits. Therefore, follow the recommended dosage instead of guessing from the amount of soil.
What About Dried Milk Residue?
Dried milk creates a tougher cleaning challenge than freshly emptied bottles. When possible, start the cleaning cycle soon after feeding instead of letting residue harden.
If your machine provides a heavy or intensive cycle, use it for stubborn residue. However, avoid aggressive scraping that could damage plastic bottles or silicone components.
Fill the Water System Properly
Many countertop bottle washers use a clean-water reservoir, while others require a different setup. Before starting, fill the correct tank with the recommended water type and amount. Never confuse the clean-water reservoir with a waste-water container.
If your machine requires drainage, position the drain hose securely before starting the cycle. A loose hose can create leaks, interrupt operation, or send dirty water into an unsuitable area.
Watch for Hard Water
Hard water can leave mineral deposits inside appliances and on feeding equipment. If you notice white residue, inspect the washer’s water system and cleaning components.
Follow the manufacturer’s descaling procedure rather than adding household acids or cleaners without approval. Regular maintenance can protect internal components and preserve consistent washing performance.
Select the Appropriate Cleaning Cycle
Choose the cycle according to how dirty the feeding equipment is and what your machine supports. A quick wash can suit lightly soiled items when the manufacturer approves that use.
For bottles containing dried formula or milk residue, a standard or intensive cycle may provide better results. If you need sanitization, select the dedicated sanitizing function or the approved combined cycle.
| Situation | Useful Cycle | Why |
|---|---|---|
| Freshly used bottles | Standard wash | Handles routine residue |
| Heavy residue | Intensive wash | Provides longer cleaning action |
| Extra germ reduction | Sanitize | Adds the machine’s sanitizing stage |
| Clean feeding gear | Dry | Removes remaining moisture |
| Clean storage | Storage mode | Protects items after drying |
Cycle names differ between manufacturers, so never compare labels without checking their actual functions. When uncertain, use the manufacturer’s recommended routine for your model.
Let the Machine Complete the Full Process
Once the cycle starts, avoid opening the machine unnecessarily. Interrupting the process can affect washing, sanitizing, or drying performance.
When the cycle ends, inspect the bottles before putting them away. Look for milk residue, standing water, detergent film, or trapped moisture inside small components.
Check Hard-To-Reach Areas
Pay special attention to nipple holes, valves, membranes, threads, and bottle collars. These areas often collect residue because they contain narrow channels and overlapping surfaces.
If residue remains, do not simply assume another drying cycle will solve the problem. Rewash the affected component using the method recommended by the manufacturer.
Dry Bottles Completely Before Storage
Drying matters because trapped moisture can encourage unwanted microbial growth and unpleasant odors. Let the machine complete its drying cycle when its manufacturer approves that method.
Afterward, inspect small components for hidden moisture. If anything remains wet, allow it to dry completely before assembling or storing it.
Do not seal damp bottle parts inside closed containers. Instead, keep clean, dry feeding equipment protected from dust, dirt, and household contamination.
When Should You Sanitize Baby Bottles?
Cleaning and sanitizing serve different purposes, so treat them as separate steps. Washing removes visible residue, while sanitizing provides additional germ reduction.
Extra sanitizing precautions can matter more for younger infants and babies with particular health vulnerabilities. Follow your pediatrician’s advice and the feeding equipment manufacturer’s instructions when those needs apply.
For older, healthy babies, careful cleaning after every feeding may reduce the need for frequent separate sanitizing. Still, your machine’s approved sanitizing cycle can provide additional convenience when you want it.
Clean the Bottle Washer Itself
A bottle washer cannot stay hygienic if you ignore its own cleaning routine. Milk residue, detergent deposits, minerals, and dirty water can accumulate inside the machine.
After regular use, inspect the water reservoirs, filters, racks, spray areas, seals, and drain components. Remove visible residue using the cleaning method specified by the manufacturer.
A Simple Maintenance Routine
- Empty waste water after each applicable cycle.
- Rinse removable water components as directed.
- Inspect spray openings for blocked residue.
- Clean filters according to the recommended schedule.
- Run the approved self-cleaning cycle when available.
- Descale the machine when mineral buildup appears.
- Allow accessible components to dry between uses.
Regular maintenance also helps you identify problems before they affect cleaning performance. A machine that smells unusual or leaves residue deserves inspection before another full load.
Common Baby Bottle Washer Mistakes
Many cleaning problems come from loading mistakes rather than weak machine performance. Fortunately, most errors are easy to prevent with a consistent routine.
Overloading the Machine
Overloading blocks spray patterns and prevents water from reaching every surface. Leave enough space around bottles and small components for unrestricted circulation.
Leaving Bottles Assembled
Assembled bottles hide residue inside threads, valves, and nipple connections. Always separate removable components before starting the washer.
Using Unapproved Soap
Regular dish soap may create excessive foam inside some machines. Use the detergent specified for your particular washer.
Ignoring Compatibility
Not every bottle, pump part, or accessory suits every washer. Confirm compatibility before placing unfamiliar plastic, silicone, or electronic components inside.
Storing Items While Damp
Moisture trapped inside closed bottle parts creates an avoidable hygiene problem. Always make sure components are thoroughly dry before storage.
Can You Wash Breast Pump Parts?
Many bottle washers also accommodate compatible breast pump components. However, pump parts vary significantly between brands and models.
Check compatibility before washing flanges, valves, membranes, connectors, or other pump components. Never place electronic pump components inside a washer unless the manufacturer explicitly approves them.
How To Make Bottle Washing More Efficient
The biggest benefit of a bottle washer comes from building a repeatable routine. Instead of treating every feeding as a separate cleaning project, establish one consistent loading and maintenance system.
Keep compatible feeding parts together and place the washer near the supplies you use most. Also maintain enough clean bottles to avoid running emergency cycles during busy feeding periods.
- Empty bottles immediately after feeding.
- Keep small components organized in their holders.
- Run full loads without overcrowding the chamber.
- Use the shortest suitable cycle for routine cleaning.
- Reserve intensive cycles for stubborn residue.
- Check finished items before storage.
- Maintain the machine on a predictable schedule.
This approach reduces unnecessary cycles while keeping the cleaning process predictable. It also makes it easier to notice changes in washing performance.
When Your Bottle Washer Does Not Clean Properly
Start troubleshooting with the simplest possibilities before assuming the appliance has failed. Check detergent dosage, water level, loading position, spray openings, and filter condition.
If bottles remain greasy, reduce the load and confirm the correct detergent. If white residue appears, investigate mineral buildup and follow the manufacturer’s descaling instructions.
If small parts remain dirty, reposition them so water can reach their openings. If the machine repeatedly performs poorly despite correct use, contact the manufacturer’s support team.
How To Store Clean Bottles Safely
After cleaning and drying, handle feeding equipment with clean hands. Reassemble components only when they are completely dry and ready for use.
Store clean bottles in a protected location away from dust, food splashes, cleaning chemicals, and other household contaminants. Avoid placing freshly cleaned feeding parts beside dirty dishes or used utensils.
Frequently Asked Questions
Do I Need To Rinse Bottles Before Using A Bottle Washer?
Follow your machine’s instructions, but removing leftover milk and heavily soiled residue before loading generally helps cleaning.
Can I Put Any Baby Bottle Inside A Bottle Washer?
No, always verify bottle materials, dimensions, and compatibility with your specific washer.
Does A Bottle Washer Sterilize Bottles?
Some models include sanitizing cycles, but you must select the appropriate function and follow the manufacturer’s instructions.
How Often Should I Clean The Bottle Washer?
Clean the machine according to its maintenance instructions and inspect reservoirs, filters, racks, and spray areas regularly.
Can I Leave Clean Bottles Inside The Machine?
You can use a machine’s approved storage function when available, but bottles must remain completely dry and protected.
Final Thoughts
Learning how to use a baby bottle washer takes only a few consistent habits. Disassemble every component, load it correctly, use approved detergent, choose the right cycle, and check everything after drying.
Just as importantly, maintain the washer itself and never overlook compatibility instructions. Start using this routine today, then adjust your cycle choices according to your baby’s feeding schedule and your machine’s capabilities.