A baby’s delicate nature means that minor mishaps and unexpected situations can arise at any moment. From a tiny scratch to a sudden fever, being prepared can make all the difference in providing immediate comfort and care. Creating a well-stocked baby first aid kit isn’t just about having supplies; it’s about peace of mind, knowing you can confidently handle common childhood emergencies. This comprehensive guide will walk you through the essential items for your baby’s first aid kit, ensuring you’re ready for whatever comes your way.
Keystones of a Baby First Aid Kit
A truly effective baby first aid kit is built upon several key principles:
- Preparedness: Anticipating common baby ailments and injuries.
- Accessibility: Ensuring all items are easy to find and use, especially under pressure.
- Age-Appropriateness: Selecting products specifically designed for infants and young children.
- Freshness: Regularly checking and replacing expired medications and supplies.
- Portability: Having a kit that can be easily transported, whether at home or on the go.
Essential Items for Your Baby First Aid Kit
Here’s a detailed breakdown of the must-have items for your baby’s first aid kit, categorized for easy organization:
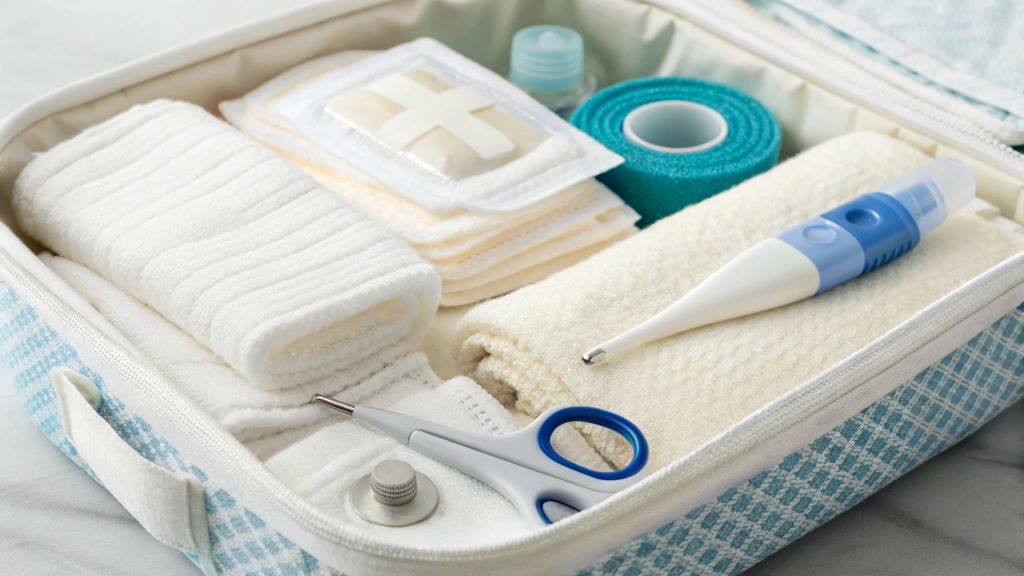
Wound Care and Injury Management
- Gentle Cleanser/Antiseptic Wipes: Baby-specific antiseptic wipes or a mild, alcohol-free cleanser are crucial for cleaning cuts, scrapes, and insect bites. These are less irritating than traditional alcohol wipes and are perfect for sensitive skin. Look for products containing ingredients like benzalkonium chloride.
- Sterile Gauze Pads (Various Sizes): For covering wounds and applying pressure to stop bleeding. Having different sizes (e.g., 2×2 and 4×4 inches) allows for versatility.
- Adhesive Bandages (Hypoallergenic, Assorted Sizes): Opt for hypoallergenic bandages to minimize the risk of skin irritation. Choose a variety of shapes and sizes, including small, round ones for tiny fingers and toes. Fun designs can also help distract a fussy baby.
- Medical Tape: For securing gauze pads or other dressings. Paper tape or sensitive skin tape is ideal for delicate baby skin.
- Cotton Balls and Cotton Swabs: Useful for applying ointments, cleaning small areas, and general hygiene.
- Sterile Saline Solution: Excellent for flushing out eyes or cleaning wounds gently. Single-use vials are convenient and sterile.
- Antibiotic Ointment (Baby-Safe): A small tube of baby-safe antibiotic ointment (e.g., bacitracin) can prevent infection in minor cuts and scrapes. Consult your pediatrician for recommendations.
- Blunt-Tipped Scissors: For cutting gauze, tape, or clothing if necessary. The blunt tips ensure safety when working near a baby.
- Tweezers: For safely removing splinters, ticks, or other small foreign objects. Ensure they are clean and sterilized.
- Roller Bandage/Crepe Bandage: For sprains or to provide support to an injured limb. Ensure it’s a size appropriate for a baby’s limb.
Fever and Pain Management
- Infant Acetaminophen (e.g., Tylenol) and/or Infant Ibuprofen (e.g., Motrin): Always have both on hand, but remember that ibuprofen is generally recommended for babies over 6 months of age. Always use the provided dropper or syringe for accurate dosing based on your baby’s weight and age.
- Digital Rectal Thermometer: This is considered the most accurate way to take a baby’s temperature. Ensure it’s clean and has a fresh battery.
- Forehead Thermometer (Optional but Convenient): While not as accurate as a rectal thermometer, a forehead thermometer can be useful for quick screenings and for checking temperature without disturbing a sleeping baby.
- Cool Pack/Gel Pack: A small, reusable gel pack (designed for children) can help reduce swelling from bumps and bruises or provide comfort during a fever. Always wrap it in a cloth before applying to skin.
Digestive and Respiratory Support
- Oral Rehydration Solution (ORS): Individual packets or bottles of ORS are vital for preventing dehydration during bouts of diarrhea or vomiting. Consult your pediatrician before administering.
- Infant Gas Drops (e.g., Simethicone): Can provide relief for gassy babies.
- Nasal Aspirator (Bulb Syringe or Snot Sucker): Essential for clearing your baby’s stuffy nose, which can make breathing and feeding difficult.
- Saline Nasal Drops/Spray: To loosen mucus before using the nasal aspirator.
- Vapor Rub (Baby-Safe): Look for formulations specifically designed for infants (e.g., Vicks BabyRub) to help soothe coughs and congestion. Avoid applying to very young infants.
Allergy and Skin Irritation
- Hydrocortisone Cream (1%): A small tube can alleviate itching and inflammation from insect bites, mild rashes (excluding diaper rash), or allergic reactions. Consult your pediatrician before use, especially on young infants.
- Antihistamine (Baby-Safe, Consult Pediatrician): For allergic reactions. Only administer after consulting with your pediatrician, as dosage is crucial.
- Diaper Rash Cream: A staple for any baby, a good barrier cream helps treat and prevent diaper rash.
- Calamine Lotion: For soothing itching from insect bites, poison ivy, or chickenpox.
Miscellaneous but Important
- Syringe or Dropper (for medication): Often come with liquid medications, but having an extra clean one is always useful for accurate dosing.
- Small Flashlight: For examining throats, ears, or looking for splinters in dim light.
- Gloves (Non-Latex): For hygienic handling of wounds and bodily fluids.
- Hand Sanitizer: For cleaning your hands before and after attending to your baby, especially when soap and water aren’t available.
- Emergency Contact Information: A laminated card with emergency numbers (pediatrician, poison control, emergency services, family contacts).
- A Compact, Durable Container: A clear, compartmentalized box or bag is ideal for keeping everything organized and easily accessible.
- Baby Nail Clippers/File: For keeping tiny nails trimmed to prevent scratches.
Building and Maintaining Your Kit

Choosing the Right Container
A good first aid kit container should be:
- Durable: Able to withstand being moved around.
- Portable: Easy to grab and go, whether it’s a small tackle box, a clear plastic container, or a dedicated first aid bag.
- Organized: Compartments or clear pouches help you quickly locate items.
- Clearly Labeled: So everyone knows what it is and where to find it.
Storage and Accessibility
- Keep it accessible but out of reach of children: A high shelf in the bathroom or nursery is usually a good spot.
- Consider a smaller, portable version for your diaper bag: Include just the essentials for outings.
- Ensure caregivers know where it is: Inform babysitters, grandparents, or anyone else who cares for your baby about the kit’s location and contents.
Regular Maintenance
- Check expiration dates: Medications and sterile supplies have expiration dates. Go through your kit every 3-6 months and replace anything that’s expired.
- Restock after use: If you use something, replace it as soon as possible so the kit is always complete.
- Review contents periodically: As your baby grows, their needs may change. You might add or remove certain items.
- Stay informed: Familiarize yourself with basic baby first aid techniques and CPR. Consider taking a baby and child first aid course.
When to Seek Professional Medical Attention
While your first aid kit is for minor issues, it’s crucial to know when to seek immediate medical help. Call your pediatrician or emergency services (911 in the US, 999 in the UK, etc.) if your baby experiences:
- Difficulty breathing
- Severe bleeding that doesn’t stop with pressure
- High fever (especially in infants under 3 months)
- Signs of dehydration (decreased urination, lethargy, no tears)
- Unconsciousness or unresponsiveness
- Seizures
- Major head injuries
- Suspected broken bones
- Any concerns that seem serious or worsen rapidly
Conclusion
Creating a comprehensive baby first aid kit is an act of proactive parenting that brings immense peace of mind. It empowers you to handle common minor emergencies with confidence, providing immediate comfort and care to your little one. By thoughtfully assembling your kit with the essential items, maintaining it regularly, and knowing when to seek professional help, you’ll be well-prepared to navigate the bumps and bruises of babyhood, ensuring your child’s safety and well-being. Remember, being prepared isn’t about being paranoid; it’s about being responsible and ready for anything.
Read More: Must-Have Toys for Six-Month-Olds
Frequently Asked Questions (FAQs)
Q1: How often should I check my baby’s first aid kit?
A1: You should check your baby’s first aid kit every 3-6 months. This allows you to check for expired medications, replenish used items, and ensure all supplies are in good condition. It’s also a good idea to quickly review the contents after any significant use of the kit.
Q2: Can I use adult medications for my baby by adjusting the dose?
A2: Absolutely NOT. Never use adult medications for a baby or child unless specifically instructed and dosed by a healthcare professional. Infant and children’s medications are formulated differently, and dosages are based on weight and age. Using adult medications can be extremely dangerous and lead to overdose or adverse reactions. Always use medications specifically designed for infants and children, and always follow the dosage instructions on the label or from your pediatrician.
Q3: What’s the most accurate way to take a baby’s temperature?
A3: For infants, a digital rectal thermometer is considered the most accurate method for taking their temperature. While forehead or ear thermometers can be convenient for quick checks, a rectal temperature provides the most reliable reading, especially when you suspect a fever.
Q4: Should I include anything for myself in the baby’s first aid kit?
A4: While the primary focus is on your baby, it’s not a bad idea to include a few basic items for yourself, especially if you’re frequently out and about with your baby and might need something quickly. This could include a headache reliever, a couple of standard bandages, or some antiseptic wipes for your own minor scrapes. However, it’s generally recommended to have a separate, more comprehensive adult first aid kit for the home.
Q5: What’s the difference between infant acetaminophen and infant ibuprofen, and when should I use each?
A5: Both infant acetaminophen (e.g., Tylenol) and infant ibuprofen (e.g., Motrin, Advil) are over-the-counter medications used to reduce fever and relieve pain.
- Infant Acetaminophen: Can typically be given to babies as young as 2 months old (always consult your pediatrician for infants under 3 months). It works by affecting the brain’s pain and temperature centers.
- Infant Ibuprofen: Is generally recommended for babies 6 months and older. It’s a non-steroidal anti-inflammatory drug (NSAID) that works by reducing inflammation throughout the body. It’s common to alternate between the two if a fever is persistent, but always consult your pediatrician for guidance on dosage and alternating medications. Never exceed the recommended dose for either medication.
Q6: What should I do if my baby gets a splinter?
A6:
- Wash your hands: Always start with clean hands.
- Calm your baby: Try to keep your baby as still as possible.
- Clean the area: Gently clean the skin around the splinter with soap and water or an antiseptic wipe.
- Use sterilized tweezers: If the splinter is protruding, grasp it gently with sterilized tweezers (you can sterilize them by wiping with rubbing alcohol or holding them in a flame for a few seconds and letting them cool). Pull it out in the direction it entered.
- Clean again: Once removed, clean the area again and apply a small amount of antibiotic ointment.
- Cover: If needed, cover with a small bandage. If the splinter is deeply embedded, very large, or you can’t remove it easily, contact your pediatrician. Do not dig for a splinter as you could cause more damage or infection.
Q7: How can I make my baby’s first aid kit more portable for travel?
A7: For travel, create a smaller, condensed version of your main kit. Use a small, soft-sided toiletry bag or a clear zip-top pouch. Include travel-sized versions of essential liquid medications, a few bandages, antiseptic wipes, a nasal aspirator, and your emergency contact information. This portable kit can easily fit into your diaper bag or carry-on luggage. Remember to check airline regulations for liquids if flying.
Q8: Are there any items I should not include in a baby’s first aid kit?
A8: Yes. Avoid including:
- Expired medications: These can be ineffective or even harmful.
- Adult medications: Unless specifically prescribed and dosed by a pediatrician for your baby.
- Anything with strong scents or dyes: These can irritate sensitive baby skin.
- Items that are not baby-safe: Regular-strength hydrogen peroxide is too strong for a baby’s skin and can damage tissue.
- Sharp, unsecured objects: Ensure scissors and tweezers have blunt tips and are stored safely.
Q9: What if my baby swallows something potentially harmful?
A9: Immediately call your local Poison Control Center (in the US, this is 1-800-222-1222) or your emergency services (e.g., 911). Have the product container ready to provide details about what was ingested. Do NOT try to induce vomiting unless specifically instructed to do so by a medical professional.
Read More: