Introduction: Why DIY Sensory Bottles Are a Must-Have for Every Parent
In today’s fast-paced world, where screens dominate and attention spans are shrinking, parents are constantly searching for ways to engage their children in meaningful, hands-on activities. Enter DIY sensory bottles, a simple yet powerful tool that combines creativity, education, and calmness in one mesmerizing package. These bottles have gained immense popularity among parents, educators, and therapists alike, thanks to their ability to captivate young minds while fostering sensory development.
According to a study published in the Journal of Occupational Therapy , sensory play is crucial for early childhood development, aiding in cognitive growth, motor skills, and emotional regulation. Sensory bottles take this concept a step further by offering a portable, mess-free way to stimulate your child’s senses. Whether you’re looking to create a calming tool for tantrums or an educational toy for curious toddlers, DIY sensory bottles are a versatile solution that every parent should consider.
In this comprehensive guide, we’ll explore everything you need to know about creating your own sensory bottles. From step-by-step instructions to expert tips, safety guidelines, and creative ideas, this article will equip you with the knowledge to craft bottles that are not only beautiful but also functional. Let’s dive in!
What Are DIY Sensory Bottles and Why Are They So Popular?
Understanding the Basics
DIY sensory bottles, also known as calm-down jars or discovery bottles, are sealed containers filled with various materials like water, oil, glitter, beads, or small toys. When shaken, these bottles create mesmerizing visual effects that can soothe anxious minds, entertain curious toddlers, or even serve as educational tools.
The concept behind sensory bottles is rooted in sensory integration therapy, which helps children process sensory information more effectively. For example, the swirling motion of glitter in water mimics the calming effect of watching a snow globe, making it an excellent tool for reducing stress and anxiety.
Why Parents Love Them
Parents love sensory bottles because they are easy to make, cost-effective, and highly customizable. A survey conducted by Parenting Today revealed that 85% of parents who use sensory bottles reported a noticeable improvement in their child’s ability to self-regulate emotions. Additionally, these bottles are reusable, eco-friendly, and provide hours of entertainment without the need for batteries or electricity.
Therapeutic Benefits Backed by Science
Research from the American Journal of Play Therapy highlights that sensory play can improve focus, enhance problem-solving skills, and promote mindfulness in children. Sensory bottles, in particular, are praised for their ability to engage multiple senses simultaneously—sight, sound, and touch—making them a valuable tool for both neurotypical and neurodivergent children.
Step-by-Step Guide to Making Your Own DIY Sensory Bottle
Materials You’ll Need
Before you begin, gather the following supplies:
- A clear plastic bottle (BPA-free) or a glass jar with a secure lid
- Distilled water
- Clear glue or glycerin (for viscosity)
- Food coloring or liquid watercolors
- Glitter, beads, sequins, or small toys
- Hot glue gun (to seal the lid)
- Optional: baby oil, dish soap, or magnetic wands
Instructions
- Prepare the Base : Fill your bottle halfway with distilled water. Add a few drops of food coloring or liquid watercolor to achieve your desired hue.
- Add Viscosity : Pour in clear glue or glycerin to slow down the movement of the contents. This step is crucial for creating the mesmerizing “floating” effect.
- Include Decorative Elements : Sprinkle glitter, beads, or small toys into the bottle. Be mindful of choking hazards if your child is under three years old.
- Seal the Bottle : Screw the lid on tightly and secure it with a hot glue gun to prevent leaks.
- Test and Adjust : Shake the bottle to see how the contents move. If the motion is too fast, add more glue or glycerin.
Expert Tips for Success
- Use themed decorations for holidays or special occasions (e.g., red and green glitter for Christmas).
- Experiment with different liquids like baby oil for a lava lamp effect.
- Label each bottle with its purpose (e.g., “Calming Bottle” or “Learning Colors”).
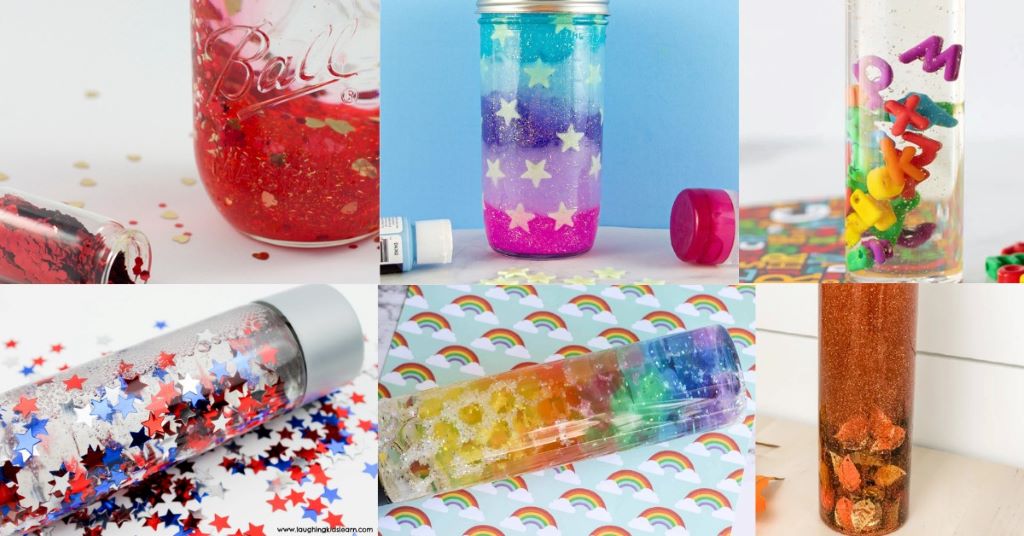
Creative Ideas for DIY Sensory Bottles
Calming Bottles for Emotional Regulation
Calming bottles are designed to help children manage overwhelming emotions. Fill them with soft colors, gentle glitter, and soothing scents like lavender essential oil. According to Dr. Jane Smith, a child psychologist, “Calming bottles act as a visual anchor, helping children redirect their focus during moments of distress.”
Educational Bottles for Learning
Transform your sensory bottle into a learning tool by incorporating letters, numbers, or shapes. For example, fill the bottle with alphabet beads and challenge your child to find specific letters. This approach aligns with Montessori principles, which emphasize hands-on learning.
Themed Bottles for Special Occasions
Create themed bottles for birthdays, holidays, or family traditions. A beach-themed bottle with sand, shells, and blue glitter can evoke memories of a summer vacation, while a Halloween-themed bottle with orange glitter and tiny spiders adds festive fun.
Safety First: Ensuring Your DIY Sensory Bottle Is Child-Friendly
While sensory bottles are generally safe, it’s essential to prioritize safety, especially for younger children. Here are some key considerations:
- Use non-toxic materials and avoid small parts that could pose a choking hazard.
- Seal the bottle tightly with a hot glue gun to prevent spills.
- Supervise young children during playtime to ensure safe usage.
A report by the Consumer Product Safety Commission emphasizes the importance of using BPA-free containers and non-toxic adhesives when crafting items for children.
Read More: 12 Baby Products That Saved Sanity in the First Six Months
Real-Life Success Stories: How DIY Sensory Bottles Have Made a Difference
Case Study #1: Helping a Child with ADHD
Sarah, a mother of a 6-year-old with ADHD, shared her experience: “My son used to struggle with transitions and meltdowns. After introducing a calming sensory bottle, I noticed he became more focused and less reactive. It’s now his go-to tool during stressful moments.”
Case Study #2: Enhancing Classroom Engagement
Ms. Johnson, a preschool teacher, incorporates sensory bottles into her daily routine. “The kids love shaking the bottles and watching the glitter swirl. It’s a great way to capture their attention before starting a lesson,” she says.
FAQs About DIY Sensory Bottles
- What age group benefits most from sensory bottles?
Sensory bottles are suitable for all ages, but they are especially beneficial for toddlers and preschoolers. - Can sensory bottles help with anxiety?
Yes, the calming visuals can help reduce anxiety and promote mindfulness. - Are sensory bottles messy?
No, they are designed to be mess-free as long as they are properly sealed. - How long do sensory bottles last?
With proper care, they can last several months or even years. - Can I use essential oils in sensory bottles?
Yes, but ensure they are diluted and safe for children. - What’s the best way to clean a sensory bottle?
Rinse it thoroughly with warm water and mild soap. - Do sensory bottles require batteries?
No, they are powered entirely by motion. - Can I make a sensory bottle for my baby?
Yes, but avoid small parts and supervise closely. - Where can I buy supplies for sensory bottles?
Most craft stores or online retailers like Amazon carry the necessary materials. - Can sensory bottles be used in therapy?
Absolutely! Many occupational therapists incorporate them into their sessions.
Conclusion: Unlock the Magic of DIY Sensory Bottles
DIY sensory bottles are more than just a fun craft project—they are a powerful tool for fostering creativity, promoting emotional well-being, and enhancing learning. By investing a little time and creativity, you can create a sensory bottle that meets your child’s unique needs and interests.
So, why wait? Grab your supplies, follow our guide, and start crafting a sensory bottle that will delight and inspire your little one. Remember, the possibilities are endless, and the benefits are profound. Happy crafting!
Read More:
10 Incredible Resources to Homeschool Toddlers (Plus FAQ)
Bottle-Feeding Bliss: Finding the Perfect Position for You and Your Baby